Ardour and Ambisonics
A FLOSS approach to the next generation of sound spatialisation
Every sound artist who works with spatialisation as a musical parameter (and who doesn’t these days?) has encountered the same situation over and over again: for some reason, the number and layout of speakers in concert venues never quite matches the demands and assumptions of your composition. Sometimes it’s way worse, sometimes just different, and sometimes, facilities sport ridiculous numbers of high-end speakers you’d love to exploit for your purposes but can’t, since it would require a complete remix of your work.
Ambisonics to the Rescue
Despair not, for there is hope, in the form of Ambisonics, a slightly difficult-to-grasp but very versatile surround sound methodology developed by Michael Gerzon et al. at the BBC in the 1970s.
For those who haven’t used it, simple (or first-order) Ambisonics is very much like M/S stereophony, where you combine an omni mic and a sideways figure-of-eight to obtain a mono and a side difference signal. It is readily decoded to stereo by a simple matrix operation (L=M+S and R=M-S), and you can easily alter the stereo width by changing the M:S ratio before matrixing. In principle, you can use this trick to compensate for a listener’s non-standard stereo triangle.
Now add a forward and an upward pointing figure-of-eight, and you have a four-channel signal set called B-Format that will give you full 3D audio. It can be rendered to (almost) arbitrary speaker layouts at the playback stage, and provides beautifully smooth panning over the full sphere, without speaker detention effects (e.g. sounds being drawn towards the speaker positions).
There is no such thing as a free lunch, however. Just like M/S stereo, Ambisonics has to be decoded before it can be played back, with a slightly more involved matrix operation augmented by some psycho-acoustic optimisations. While this does constitute an extra step, the big advantage is that, being at the consumer’s end, the decoder knows every detail of the playback system and can create an optimal rendering for whatever setup you throw at it — the production format is independent of the consumer’s speaker layout.
Oft-quoted drawbacks of classic Ambisonics are low directional resolution and a comparably small listening sweet spot. These are very real problems, but a recent development called Higher-order Ambisonics (HOA) offers remedy for both. This author has found that third-order systems are quite capable of delivering very sharply focused sources, while the usable listening area spans at least three quarters of the area framed by the speakers.
Here’s the channel count for varying levels of directional precision (and size of sweet spot):
first order |
4 channels (traditionally called WXYZ) |
second order |
9 channels (first order plus RSTUV) |
third order |
16 channels (second order plus KLMNOPQ) |
… |
|
nth order |
(n+1)2 channels |
In theory, the minimum number of speakers required for playback equals the number of Ambisonic channels, but in actual practice, a few more are needed for stable results. When horizontal (2D) surround is all you need, you can get away with 2n+1 transmission channels and proportionally fewer speakers.
If the number of available speakers speakers is less than needed for a particular order, you can always use a lower order playback system and just disregard the higher order components. There are no problems other than the loss of directional precision and the smaller sweet spot associated with lower orders — Ambisonics degrades gracefully.
You may ask: who has an Ambisonic playback rig at home or in concert venues? Well, hardly anyone… yet. But here’s the deal: you can pre-render (decode) your Ambi material to different layouts and distribute those to your audience, all from one mix. If you work in 3rd order, you will be able to cater to listeners with mono, stereo (using the very nice UHJ matrix encoding scheme), quad, 5.1, 7.1 and even more arcane systems, without having to rebuild your production from scratch. And if you have advance knowledge of that whizz-bang zillion speaker setup in your next concert hall, you can prepare a custom decoder that will exploit the concert system’s full potential, even if rehearsal time is scarce (and isn’t it always?).
Ambisonics and Open Source
Now why are these open-source types all raving about Ambisonics, while nobody else seems to give a damn? Very simple: Ambisonics has been a spectacular commercial failure. Back in the 70s, the then-existing analog implementations were expensive and tricky to get right. And after the recent quadraphonics debacle, media executives were very reluctant indeed to jump on the next surround bandwagon. Hence, all exclusive intellectual property except one or two niche patents has long since expired. Good for us!
However, the engineering behind Ambisonics is sound and future-proof. Since its commercial potential was deemed very low, most recent Ambisonic research has been carried out in the open, without new patents being applied for. That means the technology is free and can be used without royalty payments or complicated licensing. And lo and behold, there has been a huge surge of interest in the last few years. Today, Ambisonics is the pet project of many top-notch acoustics research facilities and topic of uncounted papers and quite a few Ph.D. theses and research grants. It is a strong competitor (or rather, complement) to wave field synthesis and the most practical approach to full-sphere surround in existence today.
For the electroacoustics community, its promises are portability of spatial compositions between different playback systems, and ultimately a way of distributing works to end-users in a number of formats.
Ardour
But is there an Ambisonic tool chain available? The problem with many commercial DAWs is that they are usually limited to a fixed set of surround configurations (stereo, quad, and the various Dolby n.1 formats). Most do not let you use third-party panners, which makes working in Ambisonics quite hard, if not impossible.
Enter Ardour, a free, GPL-licensed professional digital audio workstation, with some rough edges but room for lots of creative freedom. Coincidentally, Ambisonics is where Ardour really shines, because it can handle arbitrary channel counts in tracks, buses, inserts and sends. (There is this story of a major wave field synthesis research facility who once demanded 40-channel (!) buses from Ardour’s main developer Paul Davis, who smiled, fixed a minor bug at moment’s notice, and delivered.)
And thanks to its flexible routing concept, panners in Ardour are just another type of plugin, with N channels going in and M channels coming out.
An Example Project
The following ingredients are required for a basic Ambisonic production:
- A running JACK audio system, either on Linux or Mac OSX;
- The latest stable release of Ardour (2.8.2 at the time of writing);
- The latest AMB Ambisonic panning plugins and the AmbDec ambisonic decoder by Fons Adriaensen;
- A surround monitoring setup with a few speakers and an appropriate decoder configuration for AmbDec. (1)
To illustrate the finer points of working with Ardour in Ambisonics, let’s create an example session consisting of an acoustic guitar (captured in a dead space by two mics, one near the sound hole and the other near the neck), a vocal track, again recorded in a dead space, and a set of percussions done in a very live room with a first-order soundfield microphone. The room will have its first-order impulse responses taken, so that we can blend the guitar and vocals in with a matching convolution reverb.
Later, some Csound wizard will add third-order generated sounds to complete the production, and to make things interesting, the vocals will constantly change position on the upper half-sphere.
We need both a with-height output for a commissioned sound installation at a local museum and a horizontal-only 5.0 version for a documentary DVD. And we want to provide a stereo version for download on our website.
Since this is a slightly more advanced project, a few more open-source applications and some extra hardware will be needed:
- The JConv convolution engine, for the convolution reverb and for stereo UHJ encoding;
- A soundfield microphone and processor (assuming a CoreSound TetraMic and TetraProc here, but any other brand or a home-brewed one will do);
- Aliki, an impulse response measurement tool, and a good speaker to excite the room with a sweep. (2)
Quirks and Pitfalls
So you can start working with full 3D sessions today. But this is open source, there is no need to gloss over problems for marketing purposes. Here are the not-so-cool issues and how you work around them:
- Ardour does not have native Ambisonic panning (yet). This one is easy. You just bypass the built-in panner and replace it with a post-fader panning plugin from the AMB plugin set (by Fons Adriaensen, up to third order), or a custom one. Since plugin parameters can be automated, you will have automated panning even without native support. The drawbacks are no nice graphical interface (just two sliders for azimuth and elevation) and some crappiness when you want turns of more than 360 degrees: you will have to place two control points +/-180° at neighbouring samples, otherwise the image will spin backwards very quickly due to interpolation of automation data in Ardour.
- There are several standards for Ambisonic channel order and normalisation. It’s a long story :) For now, you should be fine sticking with the Furse-Malham scheme used by the AMB plugins for up to third order, but you need to be aware that there are other standards out there, especially when interfacing with native Ambisonic concert playback systems in the wild. Currently, a scheme called ACN (Ambisonic Channel Number) with SN3D normalisation is being adopted by major Ambisonics research facilities and will very likely become the future standard. Whatever the outcome, it’s trivial to build adaptors between formats, so there is no danger of your sessions becoming obsolete.
- Distance coding must be done manually. But then, no DAW or surround system available today offers a fully integrated distance panner that will do air damping, level reduction, dry-to-reverb ratio, and correct early reflections synthesis. The building bricks are there, but for now it remains a labour of love (and it requires a very good room synthesizer). Unfortunately, there are many panners and some Csound opcodes that will pretend to be able to pan a source through the middle of the speaker rig, by routing it to all channels at once, creating lots of confusion among their users. The bottom line is: this doesn’t really work.
- You will run a huge number of virtual wires. Which means that with the current lack of a really usable JACK session manager, you should get acquainted with basic shell scripting to help you set up a workspace quickly without leaving bite marks in your mouse pad. An example will be given below.
A Versatile (and Quite Luxurious) Speaker Setup
For monitoring, we want a with-height setup for our museum mix. Additionally, we will be using a subset of the available speakers in something resembling ITU 5.0 layout to monitor the DVD output, and a pair of frontal speakers to cross-check the results in stereo.
So let’s assume we have access to 15 decent monitor speakers in our studio. A suitable speaker layout geared towards our example project might look like this:
A
L R
A A
SL SR
A
A horizontal octagon at ear height, using L/R as a stereo subset, L/C/R/SL/SR as a 5.0 subset in a (very crude) approximation of the ITU layout, and all speakers for an Ambisonic rendering.
A
A A
Z
A A
A
For height reproduction, an elevated hexagon (A) and a zenith speaker under the ceiling (Z) can be added. Of course, this layout assumes there will be no sound coming from below floor level (which is a very useful simplification in real life).
Ardour Setup
First of all, start JACK. Since we will be using a massive number of connections, you need to increase the maximum number of JACK ports to at least 512 using the “-p” option. Then fire up Ardour2. Create a new session, as follows:
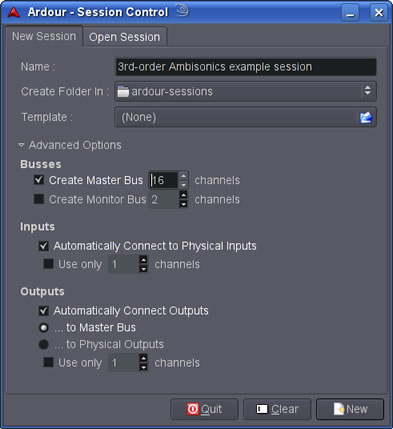
Be sure to tick “auto-connect new tracks to master bus”: at 16 connections per track, this is a huge time saver.
Now add a track. There is no appropriate template we can use (yet), so choose a “Mono” track for now. It will have one input (to be connected to the appropriate input of your sound hardware for tracking), and get 16 outputs (just like your master bus), since we chose “auto-connect to master” when creating the session.
Next thing is to bypass the built-in panner by right-clicking on the panner widget. Do the same for the Master bus. Right-click in the post-fader plugin area and select the “Ambisonics order 3,3 panner” from the plugin manager.
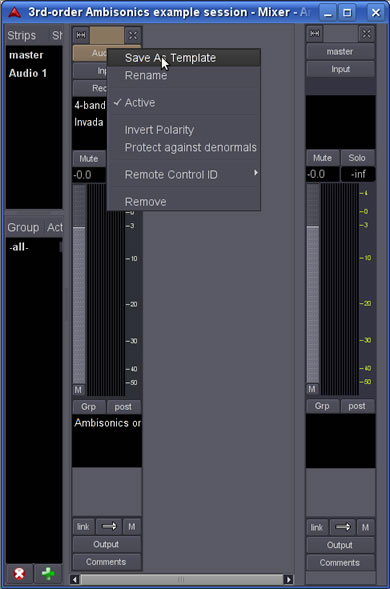
Additionally, add an EQ and a dynamics processor of your choice (for example, the lv2FIL 4-band EQ and the Invada Mono compressor). In the mixer view, click on the track name button at the top of the mixer strip and select “Save as template.” Now you can create further tracks from this template (it will appear as a drop-down option in the “Add track/bus” dialog) which will already contain the panner and pre-fader plugins: another huge time-saver.
For our example scenario, we will need another four-channel track to record the percussions with our soundfield microphone, and a 16-channel track to take the Csound-generated parts.
Finally, we add three monitoring buses which will all be fed from the master bus, to drive different monitor setups in full ambi, 5.0, or UHJ stereo (of course, only one of them must be unmuted at a time). These will feed the decoders which in turn drive the speakers.
Here is a screenshot of the complete mixer layout:

This is a good example of the flexibility of Ardour: the first three tracks are mono, the percussion is on 4 channels (first order A-Format microphone signal, converted to B-Format via the Tetraproc insert), the Csound material is 16 channels (third-order), the reverb bus is 4 channels (first order B-Format), the master bus is again 16 channels (third-order). The monitoring buses are 15, 5 and 2 channels.
Automating Session Startup
Sínce this setup involves several external applications in addition to Ardour, it is advisable to create a short shell script to automate the startup procedure:
#!/bin/bash
cd ~
jconv -N UHJenc .jconv/uhjenc.conf &
ambdec -c .ambdec/myhexagon.ambdec &
tetraproc -c ~/.tetraproc/CS20xx-def.tetra &
sleep 10
ardour2 “./3rd-order Ambisonics example session/3rd-order Ambisonics example session.ardour” &
Save this file in ~/bin/start_session.sh, and make it executable (chmod +x ~/bin/start_session.sh). Now you can invoke it from a terminal or create an icon for it on your desktop if you prefer clicking over typing. As long as all the external programs are there at start-up, Ardour will take care of restoring the necessary JACK connections.
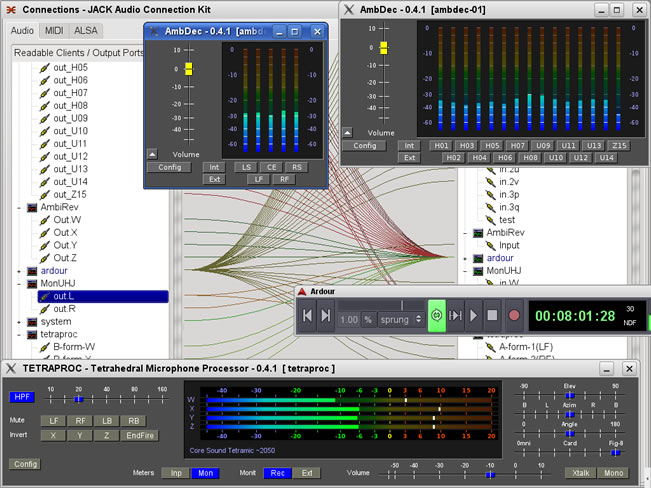
Here is a screenshot of the entire setup:
Tracking, Editing and Mixing
Now that everything is connected, you are ready to work on the mix. One thing worth noting are the reverb sends, which will be fed into a convolution reverb patched into the reverb bus, to blend the dry recordings into the natural ambience of the percussion room.
Let’s look at panning automation specifically: the task was to have the vocals move around constantly. This is easily accomplished by adding two automation tracks on the vocals, for the elevation and azimuth parameters of the panner plugin. Now you can either map those parameters to some external MIDI controller to create (and record) automation data in real-time (which can be edited later), or you can draw automation lines using the mouse.
Once you’re satisfied with the results when listened to over your Ambisonic monitoring system, switch to 5.0 playback and stereo. Often, you will find that the mix degrades gracefully with no further work necessary. With some material, you might want to add some additional tweaks here and there. Ardour’s snapshot feature comes handy in that case. Sometimes, it’s useful to plug a soundfield rotator before the UHJ encoder, for a slightly changed “listening angle,” or you might want to use an EQ on the monitor buses for subtle timbre changes of each decoding.
To wrap up once you are satisfied with the mix in its various renderings, create three more tracks to capture the final output, and connect them to the outputs of the master, the 5.0 decoder, and the UHJ encoder. Bounce your session to these tracks, convert the 5.0 and stereo files if necessary, and send them off to the mastering shop. Then take the 3rd-order B-Format to the museum and enjoy portable surround-sound.
Notes
- The setup of the AmbDec decoder is outside the scope of this article. For a quick start, AmbDec comes with a number of example configurations for standard regular speaker layouts, and a good manual.
- Impulse response measurements are outside the scope of this article, but see the Aliki manual or LAC paper for further reading.
Links
Aliki, an impulse response measurement tool
AMB plugins, a set of Ambisonic panners and rotators
AmbDec, an Ambisonic decoder
Ardour, a digital audio workstation (DAW)
FIL plugin, a 4-band Mitra-Regalia EQ
Invada Plugins, various plugins with spiffy graphical interfaces, a compressor among them
JACK, The JACK Audio Connection Kit
JConv, a low-latency convolution engine for JACK
qjackctl, a graphical front-end to JACK
Tetraproc, a processor for tetrahedral microphones
The author’s “Using Ambisoncis as a Production Format,” an Ambisonics use case from the upcoming Ardour user’s manual.
“Shake, rattle, and roll” (pdf), a project report by the author about an HOA 3D mix of Messiaen’s Livre du Saint Sacrement. [Slides (pdf); Video (ogg)]
Social top